
1. z-index 속성
레이아웃이 여러가지가 있을 때 어떤 레이어부터 띄워놓을 것인지 결정하기 위해 사용하는 속성이다.
쇼핑몰 등에 들어가면 홈페이지를 열자마자 뜨는 팝업창을 본적 있다.
사실 그것들은 팝업보다는 하나의 레이어일 확률이 높다.
팝업은 차단을 당할 수도 있기 때문이다(무서운 사람들...).
그래서 하나의 레이어를 가장 상위에 노출시키는 것이 대부분인데,
이런 작업을 하도록 도와주는 것이 바로 z-index 속성이다.
참조 : https://www.w3schools.com/css/css_z-index.asp
CSS Layout - The z-index Property
W3Schools offers free online tutorials, references and exercises in all the major languages of the web. Covering popular subjects like HTML, CSS, JavaScript, Python, SQL, Java, and many, many more.
www.w3schools.com
아래의 코드를 살펴보자 :0
<!DOCTYPE html>
<html lang="ko">
    <head>
        <title>15_zindex.html</title>
        <style>
            #aa{background-color: red; width: 100px; height: 100px; position: absolute; left: 0; top: 0;}
            #bb{background-color: green; width: 80px; height: 200px; position: absolute; left: 0; top: 0;}
            #cc{background-color: blue; width: 60px; height: 300px; position: absolute; left: 0; top: 0;}
        </style>
    </head>
    <body>
        <div id="aa"></div>
        <div id="bb"></div>
        <div id="cc"></div>
    </body>
</html>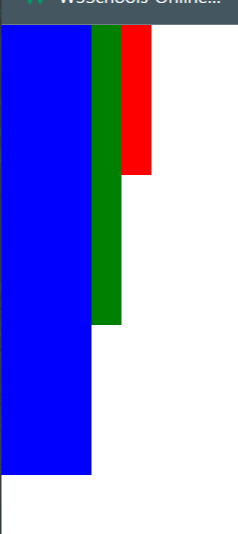
aa, bb, cc라는 레이어를 만들어서 출력시키니 모든 네모 상자가 다 겹쳐있는 상태로 출력이 되었다.
그런데 빨간 상자나, 초록 상자를 가장 앞에 두고 싶을 때가 있을 것이다.
이럴 때 사용하는 것이 z-index라는 것이다.
이제 z-index를 한번 사용해보자.
<style>
    #aa{background-color: red; width: 100px; height: 100px; position: absolute; left: 0; top: 0; z-index: 3;}
    #bb{background-color: green; width: 80px; height: 200px; position: absolute; left: 0; top: 0;z-index: 4;}
    #cc{background-color: blue; width: 60px; height: 300px; position: absolute; left: 0; top: 0; z-index: 1;}
</style>
여기서 z-index의 값은 마음대로 줘도 된다.
심지어 음수도 가능하다.
가장 큰 값부터 차례대로 출력을 하기에 숫자는 코드를 짜면서 편하게 집어넣으면 된다.
이 상태로 출력을 하면 4의 값을 가진 bb, 초록색 상자가 가장 앞으로 오게 된다.

z-index 속성을 사용하면 이미지 등을 글자 뒤에 배치시켜서 출력시키는 것도 가능하다.
'⁂ CSS > : 기본 익히기' 카테고리의 다른 글
| [CSS] #4-2 Transform으로 버튼 만들어보기 (0) | 2022.08.02 |
|---|---|
| [CSS] #4-1 CSS의 display 알아보기 (0) | 2022.08.02 |
| [CSS] #3-3 레이아웃 3 : float 속성, clear 속성 (0) | 2022.08.01 |
| [CSS] #3-2 레이아웃 2 : position 속성(Static, Absolute, Relative, Fixed, Sticky) (0) | 2022.08.01 |
| [CSS] #3-1 레이아웃 1 : 레이아웃 이해하기 (0) | 2022.08.01 |